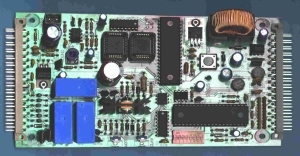
SUNRISE UPGRADE KIT for LAI "SkillTester"
This upgrade is designed to
suit the early model LAI Skill Tester machines. The player control panel was operated by a
Move Forward and a Move Right button, and there were no sound effects. The machine used
the ELAUT 48 volt crane assembly and the EAV85 relay based control board. (ELAUT = ELECTRO
AUTOMATEN VERSTRAETEN, also known as the BELGIAN crane)
The upgrade board directly replaces the old relay-based control board and adds the
following new features. No wiring changes or additional power supplies are required for
this upgrade.
- Attract music, background music and sound effects.
- Six tunes are built in. A different tune plays for each
game..
- Increased gripper coil power.
- Two stage claw power, stronger pick up.
- Electronic controls for motor speed and claw power.
- Selectable feature avoids player lowering claw into prize
chute.
- Nudge Mode, selectable.
- Self resetting fuses
- Motor and coil spike suppressors are built into the board.
- Automatic fault monitoring and reporting.
- Pre-wired speaker, and speaker grille included.
- Simple plug-in installation, no wiring involved.
- Feature adjustments are set by DIP switch, no special programmer is needed.
.
The kit for this upgrade is available
now from Sunrise Micro Solutions at AU$440.00 each, GST included,
and AU$400.00 for export buyers.
KIT CONTENTS
1
x SUNRISE Skill Tester UPGRADE BOARD.
1 x Speaker, pre-wired with plug and lead.
1 x Speaker grille and four mounting bolts
and nuts.
1 x Self adhesive reference label.
TOOLS REQUIRED
Power
tool with 40 mm hole saw attachment.
3/16" drill.
Paint for dressing up the speaker hole.
Normal
kit of screwdrivers etc.
INSTALLATION AND SETUP
Removing the old control board.
The old speed adjustment resistor and nudge switch and bracket should be removed with the
old board.
Fitting the supplied speaker.
Using a hole saw, cut a 40 mm hole in the wooden
panel below the control panel, at the front of the machine between the left side of the
panel and the prize chute metalwork. If desired, paint the surface of the cut-out. Working
from the outside of the cabinet, center the speaker over the hole, and use it as a
template to mark the four mounting bolt holes. Drill four 3/16" holes right through
the panel. Using the bolts supplied, attach the grille and speaker to the inside of the
panel.
Fitting the new board.
Refer to the DIP SWITCH setting chart and set the DIP switches according to your preference.
Mount the new board in place of the old. Note the PCB connector marked "TO CRANE", and plug the
staggered pin connectors to each end of the upgrade board. Plug the speaker connector into
the new board.
Affix the self adhesive DIP SWITCH / ERROR CODE reference label inside the front door.
Switching on.
The crane should home itself if not already in the home position. If the lamps and STATUS LED are flashing,
read the code from the error code table and make the appropriate repair. Normal upgrade
board computer activity is indicated by the STATUS
LED continuously flashing a regular 1 flash per
second. If no errors are encountered, the crane will come to rest in the home position,
the lamps will be off.
Claw Strength adjustment.
When there are no credits, and the crane has returned to its home position, push the
carriage forward and to the right. The claw will be turned on. Use the CLAW adjustment pot to adjust for the
desired claw strength. Move the crane back to the home position when done, the claw will
be de-activated.
Note: To prevent coil damage from the claw being left on too long, the carriage will
automatically home itself after a preset timeout period.
Motor speed and sound volume adjustment.
On the upgrade board, press the TEST switch to get a test credit. Operate the game and adjust the SOUND pot. Adjust the MOTOR pot to set the forward and right
movement speed as desired. (The left and back speed is always controlled to be maximum
speed.)
Testing coin input.
The transfer of credits uses the same mechanism as was used for the original EAV85 control
board. Insert test coins and check for correct operation as follows.
For unmodified machines with a mechanical mech and a lockout
coil.
The upgrade board DIP switch may be set for 1 or 2 coins per game. While the machine is
standing by with no credit, the lockout coil is turned on. When the required number of
coins have been inserted, the lockout coil turns off, preventing the insertion of further
coins, or causing their rejection. The move button lamps light up and a game may be
played. When the game is over, the lockout coil turns on, allowing coin(s) to be inserted
for the next game.
For machines with a mechanical mech and no lockout coil.
The upgrade board DIP switch
may be set for 1 or 2 coins per game. When the required number of coins have been
inserted, the lamps light up and a game may be played. Any excess credits will be stored
by the upgrade board, ready for the next game.
For machines fitted with an electronic mech, a Sunrise Credit
Board and LED credit display.
The skill tester upgrade board DIP switch should normally be set for 1 coin 1 play, with the coin / credit
conversion settings done on the credit board DIP switch. As coins are added, the credit display shows the cumulative value
of the coins and the resulting credit. When the first credit is gained, the credit board
relay will pulse, sending 1 credit to the Skilltester upgrade board. The upgrade board
releases the lockout output which floats to 12 volts inhibiting further credit pulses,
lights the control panel lamps and plays the coin sound. Subsequent credits are stored in
the credit board. After the game is over, the upgrade board pulls the lockout line to GND,
allowing the credit board to release another credit pulse, and decrement the credit
display.
DESCRIPTION OF OPERATION.
The detailed operation of the coins / credit entry system is detailed in the INSTALLATION AND SET UP section, under
"Testing coin input".
1.Power on.
The crane is driven to its home position if not already in that state. If no errors are
encountered, the crane will come to rest in the home position, the lamps will be off, and
the machine goes to "Standby, no credit". If the lamps are flashing, read the code from the ERROR CODE table and make the appropriate
repair.
2.Standby, no credit.
If enabled by the DIP switch, the attract music will play periodically. A new tune is played
each time. There are six different tunes. When sufficient coins have been inserted, the
coin sound plays, and the machine goes to "Standby, with
credit".
3.Standby, with credit.
The MOVE FORWARD and MOVE RIGHT lamps are lit. There is
no sound. Upon pressing the move forward button, the game will go to either "Move Forward, no nudge mode",
or "Move Forward, with nudge mode", depending on the DIP switch setting.
4a.Move Forward, no nudge mode.
The background music plays. A new tune is played for each new game. The crane moves
forward while the MOVE FORWARD button is depressed. The machine will go to "Waiting for Move Right" when
the MOVE FORWARD
button is released, or when a timeout period has elapsed.
4b.Move Forward, with nudge mode.
The background music plays. A new tune is played
for each new game. The crane moves forward while the Move Forward button is depressed and
stops when the button is released. The machine will go to "Move
Right" when the Move Right button is pressed, or
when a motor-on timeout period has elapsed.
5.Waiting for Move Right.
When the Move Right Button is depressed, the machine goes to "Move
Right".
6.Move Right.
The button lamps are extinguished. While the Move Right button is depressed, the crane is
driven right. The machine will go to "Drop Claw and
return" when the Move Right button is released,
or when a timeout period has elapsed. When the AVOID
PRIZE CHUTE option has been set on the DIP switch, if the crane
has not moved far enough to clear the prize chute, it will be forced to continue moving to
the right until it has done so. The AVOID PRIZE
CHUTE function will not operate efficiently if the
moter speed has been set too slow.
7.Drop Claw and return.
The claw drop sound plays, the claw is lowered until the end of descent switch is
activated. The end of descent sound plays and after a momentary pause, the claw energises,
and is raised while the claw up sound plays. If the DIP
switch option 2
STAGE CLAW POWER is set,
the claw will initially be energised at full power, and after a brief delay, revert to the
power level set by the CLAW adjustment pot. When the UP
LIMIT switch is activated, the up motor stops, the
crane is driven left, and the background music plays. When the LEFT LIMIT switch is activated,
the crane is driven back until the BACK LIMIT switch is operated. The motor and claw power is turned off, the
claw opens and drops the prize. If there are no more credits, the machine goes to "Standby, no credit" and the
background music continues to play until the end of the tune. If more credit is available,
the credit is decremented, the music stops, the coin sound plays and the machine goes to "Standby, with credit".
DIP SWITCH SETTINGS
1 |
2 |
3 |
4 |
5 |
6 |
7 |
8 |
|
| 1 coin 1 play | OFF | |||||||
| 2 coins 1 play | ON | |||||||
| Attract Sound off | OFF | ON | ||||||
| Attract sound delay 20 sec | ON | OFF | ||||||
| Attract sound delay 50 sec | OFF | OFF | ||||||
| Attract sound delay 2 min | ON | ON | ||||||
| Up / Down sound low volume | OFF | |||||||
| Up / Down sound high volume | ON | |||||||
| Nudge Mode off | OFF | |||||||
| Nudge Mode on | ON | |||||||
| 1 stage claw power | OFF | |||||||
| 2 stage claw power | ON | |||||||
| Don't avoid prize chute | OFF | |||||||
| Avoid descent into prize chute | ON |
Note: The AVOID
PRIZE CHUTE function may not operate efficiently
if the motor speed has been set too slow.
FAULTS AND ERROR CODES
Self testing checks are performed by the upgrade board computer on power up and during the
game cycle. Normal upgrade board computer activity is indicated by the STATUS LED continuously flashing a regular 1 flash per second. If an error is
detected the machine may be immediately stopped at that point in the cycle, while flashing
an error code on the control panel lamps and on the upgrade board STATUS LED.
Error Codes
Errors are interpreted by counting the number of
flashes of the panel lamps or upgrade board STATUS
LED.
There will be a longer pause, followed by a series
of flashes. Count the number of flashes to get the error code and consult the following
error code list.
Note that an item mentioned as being in error may in itself not be at fault. For example,
a broken connection to the forward/back motor may cause an error 4. Because the motor did
not operate the allowed return time expired and therefore the expected limit switch
closure did not occur.
1. Move
forward button stuck on (tested at power up).
2. Move right button stuck on (tested at
power up).
3. Left home switch not operating, or up
limit switch wrongly in down position.
4. Back limit switch not operating.
5. Down limit switch stuck or not operating
or Up Limit switch was depressed while moving forward or to the right.
6. Up limit switch stuck on.
7. Curly cord broken or coil open circuit.
8. Back limit switch not closing or up
limit switch faulty.
Fuses
There are no replaceable fuses on the upgrade board. The 24/48 volt transformer and motors
are protected by the two 500 mA polyfuse devices located at F1 and F2 on the board. In case of an overload, these devices become quite
hot and limit the current to a safe value. When the cause of the overload is removed, they
cool after a few seconds and allow normal operation. Some potential causes of overload are
a short in the grab coil or its wiring, a jam locking or slowing a motor rotor, a faulty
upgrade board.
UPGRADE BOARD CONNECTOR PINOUT
(Pins with same description are linked together on the PCB. Pins
omitted have no connection)
CN1 (From transformers)
1. Move forward input
2. GND
3. Move forward input
4. " "
8. GND
9. Coin counter output. (Open collector.)
10. 48v AC (1)
11. Lockout output. (Open collector.)
12. Coin input
13. " "
14. GND
15. " "
16. 48v AC (2)
17. GND
18. 24v AC (1)
19. GND
20. 24v AC (2)
21. GND
22. Lamp output (open collector)
23. GND
24. " "
25. " "
27. Coin input
28. Move right input
CN3 (To crane assy)
2. Motor power output
4. Claw power output
5. " "
6. Up/Down motor output
7. Left limit switch input
8. Left/Right motor output
9. Left limit switch input
10. " "
12. Claw output
13. " "
14. Down limit switch input
16. Forward/Back motor output
18. GND
20. Back limit switch input
24. GND
26. GND
ELAUT 48v CRANE ASSEMBLY WIRING DIAGRAM (for reference only).

Claw volt meter (for reference only).
Some operators find it useful to have a volt meter permanently installed in a Skill Tester machine to enable easy standardised adjustment of the claw power when rotating to different types of prizes. The optimum voltage setting for each type of prize is written down for future use. Connections are available for a meter. A 50 volt panel meter, such as part no Q0538 from Altronics, could be used. Fitting a meter requires removal of the cover from the CRANE connector to allow the soldering of two wires. Solder a wire from the meter (+) to pin 13 of the CRANE connector, and from the meter (-) to pin 5 of the connector.
The kit for this upgrade is available now from Sunrise Micro Solutions at AU$440.00 each, GST included,
and AU$400.00 for export buyers.